Introduction to Nylon String Guitars
Traditional Construction
Why Change the Action on Your Guitar
How to Adjust Set-Up
Hot Rodding C5 CET
Set-Up Tools
Take Initial Measurements
Truss Rod Adjustment
Fret Leveling and Recrowning
Nut Inspection and Adjustment
Bridge Inspection and Adjustment
Under Saddle Pickups Vs. Tone
Saddle Sanding
Intonation After Lowering Saddle
Lower Saddle VS. Tone
Introduction to Nylon String Guitars
Welcome, and get ready to learn How to Hot Rod your Nylon String Guitar for better play-ability, and even tone. The concepts and procedures discussed here are for education and enjoyment with acoustic guitars, and should be done at your own risk. These modifications may not be right for everyone, and not every guitar needs them done either. These are simply methods to change a high action nylon stringed guitar to a sleek and fast, low action finger-picking machine.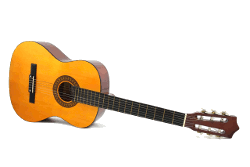
Many homes have a student guitar from earlier years when one of the family decided to take up the guitar and soon found it less than exciting. There is a chance the guitar has the typically high action found on many classical nylon strings(and steel string acoustics), and it was no help when first learning to play. By altering specific areas of the guitar such as the saddle for example, the action can be set to a more appropriate height for modern playing. This guide will walk you through these specific areas of adjustment. Please respect your guitar as if it is a valuable instrument and work carefully.
Traditional Nylon Construction
As many things throughout history, there is a progression of earlier concepts and designs before a solid form was adapted. The guitar has just such a past. Many stringed instruments where around for hundreds of years before the shape and style of the average guitar came to be.
 In the early 1800’s to early 1900’s classical guitars used materials available to them at the time for there construction. This meant strings could be made of sheep intestines instead of nylon. Now without going into too much math here, string tension has a lot to do with how a guitar is braced on the inside, bridge construction, top thickness, and so on. So making a guitar the exact same way today as was done two hundred years ago with modern nylon strings might not work out so well as far as getting the most out of a musical instrument.
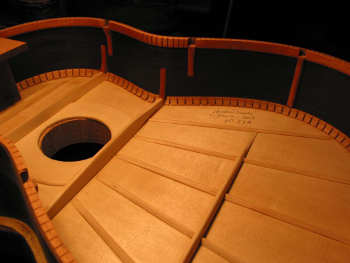
There are several unique bracing methods for acoustic guitars with each offering its share of benefits according to the purpose of the instrument. Classical guitars are just beyond the point of collapse so they can resonate to their fullest ability. Steel string guitars have mainly followed Martin’s approach, and that works as an “x” brace pattern across the top soundboard for support of the increase in string tension with steel. So this is why steel strings can’t go on classical guitars without literally crushing them, and nylon strings sound dead on steel string acoustics.
The action on many classical guitars are supposed to be high off the fingerboard. This is done to produce the purest tone out of the string without fret buzz. This height can also help vibrate the soundboard.  Flamenco guitars on the other hand had a purposefully low action in order to achieve speed and a raspy-ness to the sound. An average action on a classical can be between 8/64 and 10/64 when measuring at the 12th fret crown to the bottom of the string. On a low action electric for comparison it could be as close as 2/64, but keep in mind steel strings don’t slap around as much and are smaller compared to most of the string gauges used.
Why Change the Action on Your Guitar
Well there are several reasons to lower the action on your acoustic guitar. Mainly the reason is playing comfort. Now it needs to be understood that some of the chime related to classical guitars comes from the higher strings. Some guitars are affected more that others as all the variables with guitars adds up. For many players an action close to the frets allows greater control and steady flow from note to note instead of gaps where a string is being pressed down.
Second, the biggest reason to adjust the set-up would be intonation. This is what gets most classical guitars in trouble. A strings length has a natural rest position above the fingerboard and it has a fretted position which is more of an angle from the bridge because your pressing down, when you have too high of action the fretted distance is extended and causes notes to go flat easily. Quality guitars might compensate this with a specific saddle carve, but most entry level guitars can’t avoid this problem. Lowering the action on your nylon string guitar can help correct intonation problems.
How to Adjust Set-Up
It is assumed you the reader has a basic understanding of how your guitar works and is made. The areas of interest when changing the set-up are the nut, frets, neck, bridge and saddle. Strings can also come into play as a factor in sound quality and clarity. Not all these listed parts will need to be altered but they will be looked at closely to see how well they are shaped. The adjustments should be done slowly and a final set-up should be worked into gradually. Take the saddle for example, it’s nice to do it in steps because you can’t add to a saddle once it has been sanded down.
Hot Rodding a C5 CET
Our project guitar is a C5 CET from the brand Cordoba.  This one is a natural finish but it also comes in black gloss too. It features a Cedar Top and Mahogany sides and neck, and Rosewood fingerboard and bridge. The nut and saddle are bone. It is an entry level guitar with a Spanish classical feel. The tone is very vibrant with the set-up out of the box. We will use this guitar to create a, super fast playing thin-body nylon guitar perfect for sitting on the porch or deck during the summer.
The CET is a very comfortable guitar to play as it seems to disappear when sitting in your lap. It’s uncertain the exact weight as of now but it feels between 2-3 pounds max. It’s a feather of a guitar and at the same time has a very good projection and strong resonating state when played.
Tools For Perfection
If you are new to refining a guitars action, there is small list of tools needed for this precise of work. They are fairly inexpensive for the precision machining needed to make such tools. If you are going to be a DIY’er and maintain your own collection of guitars, these tools will be useful over and over again. The initial investment is worth it.
Tools Recommended:
- Notched Straightedge- First, we can’t tell how straight a fingerboard is by using our eyes. So we can use a straightedge to do the job. Since our frets might not be level, we need to sit it down of the fingerboard. A notched straight edge works great for this inspection.
- Leveling Beam- When getting the frets leveled for even performance and a reduction of fret buzz, a level plane must be used. Leveling beams made specifically for fret jobs offer the best results as the length and width are perfect for the size of the fingerboard . A substitution could be used as long as the surface is machined perfectly level and flat and it won’t hit the bridge or other components. An extra .01 inch can create buzzing problems so try not to skimp on this tool and get something ground down perfectly flat.
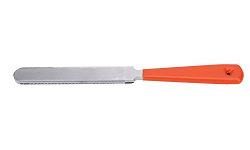
- Fret Files- This is a step which takes a bit of your own judgement. We use a simple crowning file made for most situations and it does the job. There are many specific sizes and shapes to choose from which give great results, at great prices too. A good file means less time sanding and taking out chatter marks from the fret metal.
- Sand paper- We will use sand paper for a few different steps so we need a few different grits. For the rough side or our work will get down to 180 or 220 grit paper for sanding the saddle and course file marks left on the frets after crowning. On the lighter side, we use 600, 800, 1500 to bring the frets and fingerboard up to a soft polish. Get a decent wet/dry sand paper that won’t tear.
- Permanent Marker- The best kind is simply a black permanent marker. We will use this for marking a reference line on the saddle before sanding and we use it on the frets to make guide marks (much like a guide coat when doing body work on cars).
Take Initial Measurements
First before we touch anything, we will take measurements for reference. It is not critical to do this as your fingers will tell you if it’s a good height or not, but to have numbers to look back on is a great benefit when working with such small adjustments as a 1/64 of an inch.
We start by placing a capo at the first fret, placing it on top of the metal fret so we don’t use the nut in our measurements. Measure at the 12th fret from the top of the crown to the bottom of the string. The unit of measure is your choice. You may prefer metric units and that’s fine. We are using 1/32ths since that is what on our scale. Write down the numbers for all six strings. Now the strings can come off.
Initial String Height (Capo on 1st Fret)
| String | Measurment |
| High E | 3/32 |
| B | 3/32 |
| G | 3.5/32 |
| D | 4/32 |
| A | 4.5/32 |
| Low E | 4.5/32 |
Truss Rod Adjustment
The truss rod is a little misunderstood. It is not for adjusting anything except the straightness of the neck, or “relief” as it’s called. It’s function has the result of raising or lowering the string height, but that is not it’s purpose. This is like running through the sprinkler in the summer, and claiming your watering the grass. Well yes the grass does get watered. Using a truss rod to the extreme ends of it’s travel is a dangerous place to live and could make your guitar unplayable. Adjustments are made in small increments. Not all guitars use truss rods so you may need to brace the neck into a fixed position while leveling the frets.
To begin after we have our measurements, and the strings are removed, we now focus on the straightness of the neck and more specifically the fingerboard. Using the notched straightedge, lay it parallel to a string path and inspect where it contacts along the fingerboard. If there is a gap somewhere in the middle of the straightedge tighten the truss rod (*tighten by about 1/4 inch turn at a time, then let the guitar settle for a half hour, then adjust again if needed, don’t rush this step) until the relief is gone and the neck is as straight as you can get it. If there are gaps near the nut or the body/ neck joint this could indicate a warped fretboard. When leveling the frets this should be taken into consideration as lowering the frets to accommodate this slight back-bend may leave too little fret material and the guitar will be difficult to play.
Fret Leveling and Recrowning
Once we have gotten the fingerboard adjusted with the truss rod, or manually holding the neck with a jig or straps it’s time for fret leveling. This is not a hard procedure, but it sounds a little scary. Go slow and you will be fine. 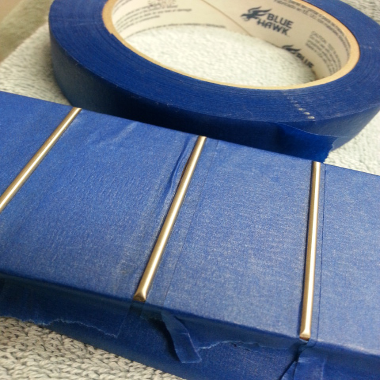 Start by putting masking tape across the fingerboard leaving the frets exposed because we don’t want marker or file scratches on the nice wood or even inlays if there are any. Now take a marker and draw a line down the top of each fret from one end to the other. Now that the guide marks are on we use the leveling beam.
I usually start from the body and work toward the nut, but what ever your comfortable with is fine. Generally 180 to 220 grit will have enough cut for easy sanding. Anything above 330 grit and it takes a while to sand the frets level. Let the beam do the work and guide it in one direction and lift it up and start back again, doing it in one direction. Get all the frets, and hang over the side by 1/4 to 1/2 inch to get the fret ends too, but keep the beam flat to the fingerboard. Try to do one pass for each string, each time starting where the next string would sit as this will keep the fret radius from flatting out. So you would do six passes then check your marks you made. Think of passes from a lawn mower except always guide the sanding in one direction.
Once you have done a set of six passes, inspect your marker lines. Look at the very top of the frets. Don’t worry about removing all the marker, we only want the top touched. You should see some of the frets are sanded clean (scratched up) and some places still have marker. Note how much has been removed, if more leveling is needed, make sure there is still enough fret material to keep leveling. If you feel the frets are in danger of becoming to short then stop leveling. 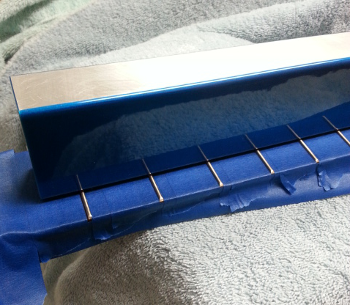 If more leveling is needed. Continue with the set of six passes and check again. Repeat if necessary until most of the marker from the fret tops are gone. We will still take a tiny bit taken off when we re-crown and file the frets so just a hint of marker will probably be removed in the next step.
Now that the fret tops are level, or 99% level, and they look flat and scratched, it is time to bring the correct shape back to the frets. Our method is fairly simple as we will only use a basic crowning file but you can get very impressive diamond files in various sizes.
Start by remarking the frets because we want a reference again. Draw a line down each fret top again and file along the fret in a single direction, noting the marker lines. The crowning file will cut only the sides of the fret, and not the very top. This is how it brings back the crowned shape. So we want our marker lines to now get very slim down the top of each fret. That’s what we want. We don’t want to file the marker completely off, as that would change the fret level we just worked so hard for. Once all the frets have a nice slim line down the top the filing is done.
Next we need to get all those nasty scratches and file marks off the fret. Here’s where the time consuming work comes in. Take some 400 or 600 grit paper and manual sand the sides of each fret to remove the file marks. Don’t worry too much about the fret tops at this point. Get all the side scratches off.
At this point we still have the masking tape on, and now we have to take 800 grit and wrap it around a finger or two and slide the paper up and down the frets. Imagine running a slide up and down the frets. Run right over the tops and sides all in the same stroke. This will take out the 600 grit scratches and also help round the crown shape of each fret.
Next we use 1000 or 1500 grit sandpaper. At this point the tape is removed and the paper around your finger process continues. The fingerboard will actually be smoothed by the sandpaper as well as the frets. This is getting to the point you will have to use your own judgement as to how refined you want take this finishing step. 1500 grit leaves a very smooth surface and will be fine to end the entire leveling process at this point. You can still use higher grits like 2000 if you can find them. Some folks will use a metal polish to get frets up to a super high shine. Care should be taken to not get polishing compound on the fingerboard. Done well you will notice an easier time moving between positions on the fingerboard and getting the strings to ring cleanly.
Finally use some lemon oil or your choice of cleaner for fretboards or even naphtha can clean well. Get all your work shavings and polish off now while the strings are off. Also doesn’t your fretboard look great after all that focused work you did?
Nut Inspection and Adjustment
The nut of the guitar is a little misunderstood too. Yes it has those slots to hold the strings, but are the slots the best they can be? The nut really only gets some attention if there is an issue, or you’re making one. The nut does four very important things. It is the breaking point at one end of the strings, It sets half the open string height, it is part of the intonation of each string, and it keeps strings from falling off the guitar neck. This guy does a big job and gets very little credit.
At the ends of the nut where the first and sixth strings are, there should be a nice smooth roll-off so your hands don’t bump against it when moving around. You would be surprised how many nuts are very block shaped at the ends. Cover the area with masking tape and take some 800 grit sandpaper and smooth those down if you need to. Our C5 CET project guitar did need a tiny bit of edge sanding to help the hands when at the first fret position. Also for bringing the thumb over the top it’s a benefit.
The slots should allow the strings to sit up and out of the nut by about half the strings diameter. Many, far too many nuts are cut way too deep. This doesn’t ruin anything other than tone of the open strings, but it’s not significant usually. This tends to happen as the sting height is adjusted and the slots are deepened instead of shortening the entire nut. It may cause a buzzing effect if the string dances around in an over-sized slot. The two remedies are replacing the nut, or filling the slots with glue and bone dust and cut a fresh slot. The string height should be checked while fretting the first fret. Because there isn’t an easy screw to turn the nut is usually left alone, but a new one can always be created if you have the resources.
The shape of the slot is important too. The slot should curve back to the same angle as the head stock. Also the break point of the string should be the leading edge of the nut(fingerboard side) as this is where to intonation for the string occurs. Moving the break point closer or farther will change the scale of the string should it need altered. Most of the time a bridge adjustment corrects upper fret intonation problems, but sometimes altering the nut helps with a completely out of tune string.
The C5 did come with a well made nut with good string exposure and only took a small amount of sanding on the high E and low E sides to make it extra smooth. It now doesn’t even come up on our fretting hands radar. The intonation will be check with a tuner when finished and in may be necessary to change the break location back to get tuning correct.
Bridge Inspection and Adjustment
When checking the bridge, we want to examine how well the saddle sits in the saddle slot. Specifically how flat is the saddle to the bridge. Are there any cracks at the front or back of the slot? Does the bridge’s base rest on the body or is it lifting? Also, how much of the saddle sticks up from the slot? The bridge is a huge part of the guitar. It takes all that vibrating energy and puts it into the guitar body. So to do that best it can, it needs to be right on top of the wooden slot of the bridge.
This can alter your action to a lower stance on an acoustic guitar, but keep in mind acoustic guitars are meant to ring out loud. This can mean hard strumming and picking so we don’t want to drop the action as low as an electric guitar. The big strums still need some bit of breathing room to chime and get the strings to do their thing.
Under Saddle Pickups Vs. Tone
The C5 comes equipped with a pickup under the saddle. The tuner uses this as an ear as well. We noticed the saddle was floating over the wooded bridge slot by a hair or two on the low E side and fit very flat and snug on the high E side. After removing the saddle by simply pulling up, we exposed the piezo pickup by Fishman. The pickup was larger than the slot, and it was not letting the saddle rest against the bridge. It could be sighted down the slot and seen as a high point.
So the pickup was lifted up and it was seen that dark pressure marks where made by the strings pressing the saddle which pressed on the pickup wire. This was not a satisfying feeling knowing the guitars entire resonating tone was transmitted through braided wire. So to correct the issue until we are able to collect the correct tools to deepen the slot, we are removing it by simply pushing it back into the body of the guitar. This gets the bridge to rest flat on the bridge to transmit string energy better.
End result…see in the final thoughts below.
Saddle Sanding
I’d like to take a moment to shine light on something. One thing that no one talks about is the break angle at the fret. There are plenty of discussions about the break angle at the saddle and into the bridge holes, but what about the fret break angle? Many claim that a small angle(string almost flat across the saddle) will reduce tone and volume and sustain. The angle at the fret must be very small, maybe 5-10 degrees when your finger presses down on the string. No one complains about tone from the fret. Just some interesting thoughts before we lower the height of the saddle.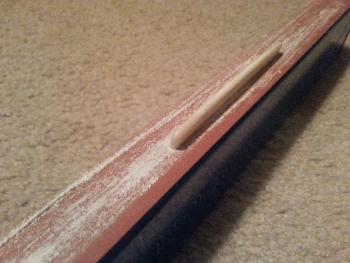
If you can’t stand the thought of your guitar changing in any way maybe just don’t mess with the saddle. For our acoustic guitar, we choose to bring the action down from the classical height to a more modern player friendly match. The benefits of having a bone nut and saddle are the sound is great, and they’re easy to sand down.
First we took our permanent marker and drew a line down the edge of the saddle at the back bottom corner. Rest the edge of the marker felt on the saddle and let the saddle edge guide the marker for a nice straight line. This will give us a visual as to how much material we have taken off. Remember when we take 2/32 off the saddle bottom, it equates to 1/32 at the twelfth fret.
Now we use our leveling beam as a saddle sanding block. Get some nice sticky backed paper of 240 or so and place it on the sanding beam. Run the saddle down the beam in one direction keeping it flat to the surface. No pressure is needed as the paper will do the work. It’s best to take it down to a very fine line remaining. This is your safety net if you might go too far. You can re-sand the saddle if it’s still too high. But that’s cake compared to making a new one from a bone blank. So leave some safety net for yourself.
Intonation After Lowering Saddle
The C5 was re-sanded to the point where the saddle is just high enough for the strings to clear the front edge of the saddle slot. This put the strings down to an almost even height across the entire fretboard. It is much different to play now. It has an almost electric guitar feel to it now. One thing to keep in mind is the intonation has now changed. The string length from fret to saddle is now shorter and some adjusting of the breaking point on the saddle, or in this case the nut needed sanded back some to increase the scale length of all the strings but the G string. Without adjustment the twelfth fret notes where very flat compared to the open string notes. Your saddle may be different and not need such a dramatic lowering. In total our saddle was sanded down by nearly 3/16 of an inch or so. This might be too much change if you paid big money for a high end guitar. In our case the C5 CET is a started level guitar so we don’t mind altering it in such a drastic way. Part of the fun of this kind of guitar is it doesn’t hurt to make changes. One thing we kept in sight was the fret height for any string buzz. We inspected the fret height to sting bottom constantly so we knew how low not to go.
Lower Saddle VS. Tone
Saddle sanding is nothing new. Although there aren’t may people who think that an acoustic bridge is adjustable, it is very adjustable in terms of height and intonation. It just doesn’t have pretty screws to turn. The lowering of a bone saddle height can have an effect on the tone of the guitar. This varies from guitar to guitar, but it did a fair amount on our Cordoba C5 CET. The bass and mids come out a bit more in the entire spectrum of notes from low to high. Still the notes remain separate and not muddy. So if you can’t stand the thought of your guitar changing tone in any way, maybe just don’t mess with the saddle.
Final Thoughts and Insight
To recap what we did it goes as follows. First we leveled the fret array. Sounds cool eh? Cleaned the fingerboard and sanded down the nut ends for a better first fret position feel. Next we sanded the saddle down to the height we wanted leaving us with about 2/64 (low E) and 1.75/64 (high E) total at the twelfth fret (capo on first fret). The stings still ring out when strummed hard. The stings do now rest on the rear of the bridge behind the saddle. This seems in theory as the same concept a sting-thru-body designed guitar will have. For each string there is the saddle point, the body point (bridge base), and the fixture part at the end of the string (where the string is wrapped). In conclusion the tone and playability is still very nice so we won’t carve gaps under strings as some folks do for acoustic bridges. Finally the pickup was pushed back into the guitar body and out from under the saddle.
The pickup was removed due to obstructing the saddle from fully seating onto the bridge material. On this Cordoba CET, this made a remarkable difference. The tones of the highs went from a plastic/ nasal-ish tone to a warm woody tone. It’s not to distant from a steel string acoustic feel. The mid strings balanced out and still are independent. The low end tones balanced out more also. This being a thin bodied guitar, the low E does have a subtle reduction in the “umph” factor. It’s a subtle reduction but it’s there…er… not there. There is a full size version C5 CE also. As before, getting the bone saddle to resonate directly to the bridge has made the guitar seem as a voice that has gotten more sophisticated and natural at the same time. Next time we’ll take a maple insert that we can make from a tree branch and fill the gap under the saddle for an experiment into more resonance.
The ease of playing our C5 has increased and the sustain feels more natural as there aren’t the gaps in the notes while pressing down the strings. The path from the “at rest” position to the fretted position has decreased due to the lowering of the action. As a result the intonation from the middle of the neck upward has gotten even in tune.
Also the strings were changed from the factory high tension to a normal tension set for even further ease of playing. The volume as not increased, and possibly decreased ever so slightly. At the same time the guitar seems to respond to the various flesh, fingernail techniques with more dynamics, loud and soft.
This is a fresh guitar that is near only 6 months old and as such may change shape in one way or another as it ages and goes through summers and winters. Taking the set-up down to the lowest possible position is a bit unwise at this time. Give the instrument some time to learn how to be a guitar and not a tree.
Not all guitars will behave the same so go slow about your work. If your guitar has some real value it might be wise to at least spend time to show a professional what your thinking of doing. They will most certainly have load of insight for you. We hope this page makes your stringed instrument of choice a better one for years to come. If you made it here thanks, no really, thanks for reading.