How an Acoustic Guitar is Built
The Body
Raw Materials
Body Shapes
The Nut
The Neck
The Bridge
How to Adjust Acoustic Guitar Setup
Bridge and Saddle Adjustment
Neck Relief Adjustment
Nut Height and Slots
String Gauges
Many guitars need some adjustment to play at their best for the individual player. Here we will look at How to Lower Action on Acoustic Guitar. It’s more than a factor of bringing the strings down to the lowest point, it has to do with bringing the most music out of the instrument. The less movement from your fingers the better. When the string action is too high it can even cause dead spots in the music from lifting and repositioning the fingers. This can be eliminated with a better suited sting action. Let’s start with the basics to get the ball rolling.
How an Acoustic Guitar is Built
Today it seems that acoustic and electric guitars have a better relationship than ever before. At one point traditional instruments and electronic instruments where almost doing battle with each other as far as the culture was concerned. Folk music resisted against rock, and rock was too full of itself to bother with other styles. Well luckily for us the worlds have mixed and acoustic guitars are more respected than twenty years ago. Although acoustic music was established first and has been around longer. To understand the methods to make them play a whole lot nicer than the factory sends them out, first lets learn about construction.
The Body
Acoustics bodies vary as much as sandcastles. Materials and construction are as unique as the people who build guitars. The body is the heart of the instrument and needs the best ingredients for optimal performance.
Body Materials
The materials used for the sound box can be natural and man-made synthetic. Woods such as Spruce, Rosewood, Mahogany, Maple, Cedar and Ebony are the most widely used species. There is of course plenty of custom guitars built with many rare wood types so there really is no limit to a builders creativity. Woods such as Oak and Pine can be used but their sound verses density makes them less attractive musically.
Body Shapes
Some guitar shapes have been accepted as the standards and show no sign of changing right now. As time has moved along, it has influenced everything from where people play to what is being played. That’s no surprise, but as things change the reasons for different body shapes has changed too.
Dreadnought
The original dreadnought shape was launched by CF Martin, and was named after the largest English warship at the time. It features rounded shoulders, and the neck typically joins the body around the 14th fret. The dreadnought produces massive volume with easy playing feel. Every maker of acoustics has a dreadnought shape of some type.
Parlor
The smaller house guitars where known as parlor guitars. These were the equivalent of the television. What does that mean? This was entertainment that most people would enjoy in their parlors. The “game room” to put it another way. 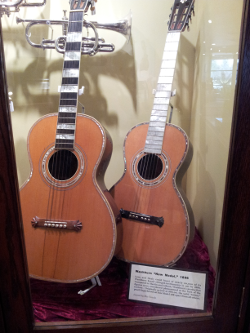 This was around the 1920’s to 1940’s and oddly this was around the time steel strings and nylon strings flipped in popularity. Still the smaller body shapes have lasted to this day.
Jumbo
The jumbo acoustic was the result of players wanting more bass and volume.  These large bodied guitars sit well in big bands and are best suited for rhythm parts. The jumbo is not for everyone as they do feel massive after holding them a short time.
Auditoriums
For orchestral music move volume and clarity was needed. Guitar makers have come out with the auditorium body shape.  This is a larger shape for a bigger sound but sometimes these can be strung with nylon strings as well. Also a times the body comes with a cutaway for higher fret playing.
Classical Guitars
Perhaps the most popular and recognizable due to it’s age, is the classical guitar. These are the traditional of traditional and are the most misunderstood in today’s electric culture. 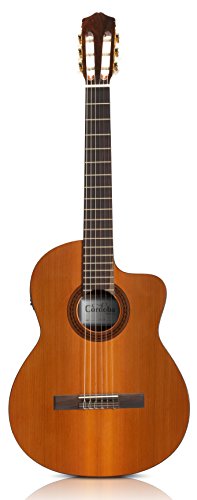 More timbres and tones are found in a good classical than most Les Pauls but they don’t sell the cool factor.
The Nut
The nut of the guitar is a simple component that does more than simple things for a guitar. The nut will keep the strings on the guitar neck of course, but it so much more. It adjusts intonation of the strings, it sets the string height and it also determines how open strings sound. The nut sits there quietly as if it’s not doing anything, but we can’t live without it. The nut’s correct shape and materials are critical to make or break a guitars feel.
Nut material can be anything from natural bone and metals to newer synthetic materials such as Tusq. Many comparisons keep coming back to natural bone materials for the best overall tone and resonance. When it comes to under saddle pickups thou, man-made materials have a more consistent density which helps with string balance. Like many things, it’s a toss-up between the pros and cons.
The Neck
A guitars neck can be constructed of a single piece of wood or it can be an assembly of various pieces. Many basses have multiple neck pieces and are of different wood species as well. Either way the neck gives sustain and character to a guitar’s tone. The woods of choice are Mahogany, Maple, Rosewood, and anything else a guitar maker can craft a neck from. The depth and height can be very similar from one guitar to the next, yet the feel can come across vastly different.
Necks are joined to the guitar body by either a more modern connection such as the hardware based “bolt-on” or the very traditional “dovetail” shaped joint. Classical guitars can use a simpler block form known as a”Spanish heel” which uses a single block surrounded by the top, back and sides.
Necks made after the 1960’s began to use a newer feature for keeping that long piece of wood known as the “neck” straight. The truss rod was soon adopted into both acoustic and electric families of the instrument. Truss rods allow a small movement of the neck, to adjust the shape in relationship to the strings. It doesn’t alter string height, but it does move the neck, which then makes it seem as though it moves the strings. Small adjustments can also alter tone from soft to bold in some guitars so it’s a bit of trial and error at times. Truss rods are a very important part of a fine playing instrument and can allow adjustments to be made where before them a neck could warp easily.
The Bridge
The guitar bridge is a complicated piece to construct with any kind of precision. The bridge, like the nut, has a handful of jobs to do. The difference is everyone gives the bridge all the credit for tuning and action. The bridge does hold the strings onto the guitar as well as sets the breaking point and intonation for each string. 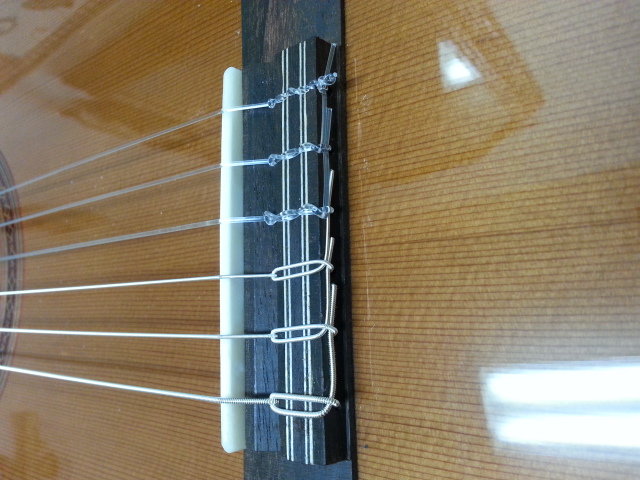 Another thing a bridge does is determine the string height in relation to the nut end of the string. The last thing a good bridge does is it gives your hand a place to rest. If the edges where your hand lays were left unfinished you would constantly try to re-position your hand as your playing to get away from that course corner.
How to Lower an Acoustic Guitar Setup
Here we discuss how to How to Lower Action on Acoustic Guitar. The concept is to bring the playing action of the instrument down to a more conformable position. The proper height can reduce gaps or “chocking” when playing. The notes can flow from one to the next much easier.
*A word of caution here. There are certain factors that are affected when changing the physics of the action. First, the tone could mellow out and become more “woody” with slightly less upper-mid tone. Second, if the strings are brought down too low, the feedback from the strings to the fingers will diminish. This will give a quick feeling when fretting notes, but there won’t be much string action for your fingers to sink in to. Also vibrato is more difficult with super low strings. So if you are convinced that these procedures will do you guitar some good, then keep reading.
Bridge and Saddle Adjustment
Making changes to the bridge and saddle is another process to take slowly and is the number one thing how to lower action on a acoustic guitar. Removing a small amount of material at a time will prove the best way to get things right where you want them. It will take a lot of trial and error. It just does.
The bridge saddle maintains the height of the strings at one end and also helps set intonation for each string. The saddle can be reduced in height to lower the entire string array. First take a permanent marker and draw a line down the edge of the saddle at the back bottom corner. Rest the edge of the marker’s felt tip on the saddle and let the saddle edge guide the marker for a nice straight line. This is a reference as to how much material will be removed. Remember when you come down 2/32 off the saddle bottom, it equals 1/32 at the twelfth fret.
A leveling beam or any very flat and straight object can work. Use 220 grit sandpaper and run the saddle down the beam in one direction keeping it flat to the surface. Almost no pressure is needed as the paper will do the work. It’s best to take it down to a very fine marker line remaining. This is your safety net if you might go too far. You can re-sand the saddle if it’s still too high, but that’s cake compared to making a new one from a bone blank.
Neck Relief Adjustment
For the neck to achieve the most even playing action across the entire fret board the neck will need to be fairly straight. Yes there are those that will get out the feeler gauges and dial in some perfect number from the factory world, but really if it feels right in the hand than go with it. For many of the guitars I believe are very comfortable and smooth playing instruments there is much less than the factory suggested relief specs. It’s all player preference.
In general, tightening the truss rod nut will increase tension on the neck and pull it back to some small degree. Loosing the truss rod lefts the neck wood relax and go toward the pull of the strings. Tighten the truss rod in small 1/8 to 1/4 turn movements and try to play it for a few hours and let your hands get used to it. Too many adjustments too fast, and your hands and brain have a harder time sensing what feels the best. There can be some dramatic tone differences when making the neck stiffer especially in acoustics. The tone and volume can increase quickly with just a 1/4 turn of the truss rod wrench when the neck and body are a stiffer assembly. Think of a metal tuning fork verses a rubber tuning fork. One will ring a whole lot longer.
Nut Height and Slots
The nut is as important as the saddle when it comes to intonation and string action. A nut with too low of slots could let strings buzz off a fret if the saddle or relief is adjusted too low. The nut should be adjusted last, as the height of the strings at the first fret will decrease as the saddle is sanded down shorter and also a neck relief change will alter the “cowboy chords” area too. Chances are the nut from the factory is not well shaped and has the slots too deep after their height adjustments. Some 600 grit sandpaper can ease the corners of the block and running a sanding block over the nut top can expose the slots for proper seating of the strings.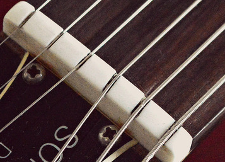
If the nut is too low it can be shimmed from underneath. Slowly sand the shim down with a flat sanding block to achieve the correct height. The other option is to replace the nut with a newly made one. That can take more time than the shim method, but it’s player preference here.
String Gauges
The width of a string isn’t much to trip your feet over but it can affect the action of your guitar in a profound way. String sets come in a wide variety of sizes and materials. Finding a favorite string brand is a path you must go down alone but it’s good to get input from others. Your fingers might like one sting set over another, so it’s good to get your guitar liking that same set too.  The smallest strings won’t have too much problem coming closer to the frets, but the bass strings may have a problem. When bringing the action and neck into a tighter assembly the addition of extra material from a string can take away the “dig in” flubby-ness that many players like and vibrato will be more difficult also.
Larger strings also don’t swing out from the rest position as much due to the added tension compared to thinner strings. So on one hand larger diameter strings will cause more interference at rest, and at the same time cause less interference when in motion. It’s up to you how to approach your particular instruments needs.
Precautions and Recap
These procedures will make changes to your instrument, and when anything changes the result changes. How much it changes is the issue. Maybe the change can’t be heard by the human ear, but the sound will change in some aspect.
Intonation over the entire guitar will change ever so slightly when moving the action up or down. The best practice is to adjust intonation after all the height movement is finished. The saddle break edge can be moved back and forth with sanding and also the nut break edge can also be sanded back for correcting intonation. Use a good tuner when setting intonation.
A very wise thing to do would be to play on the new adjustments for a few hours or a day or two if possible. This will give your hands and brain time to settle in with the new feel for an even more accurate conclusion. The buzzes may start to reveal themselves as you tighten the string up to pitch and this is a good indicator how far from the frets your strings sit. Once the strings are up to pitch the buzzes should go away, but keep in the back of your head how little separation there is between strings and frets now.
We hope this page helped inspire your musical journey and get you down your path a little further as every thing we learn does.